Everything to Know Before Buying a CNC Router Machine
If you’re planning your first CNC projects, buying a router can feel overwhelming. Specs, sizes, and hidden costs make it easy to choose the wrong tool—and that means poor cuts, delays, and a blown budget.
Follow a simple plan. Size the table to your projects and shop space. Match rigidity and spindle power to your materials. Pick motion hardware and CAD/CAM, and you can learn fast. Budget total ownership (tooling, dust, delivery, training). Require a test cut and real support; consider using only with a warranty.
This CNC router buying guide walks you through each step so you can make the right choice with confidence and avoid costly mistakes.
Choose the Right Work Area and Footprint
Pick the machine envelope to fit your largest parts and a safe loading space. Leave room for dust hoses, screens, and service access so jobs run smoothly. This is where your choice of work area sets everything else up.
Work Envelope vs. Project Sizes
Your envelope is the X, Y, and Z travel that the gantry can reach. If you make cabinet parts or long signs, you may outgrow small beds fast. Some controllers support “tiling,” letting you index long work along one axis, but it adds setup time and risk. Depth matters too: Z travel must clear your thickest stock and bit stick‑out. Aim for a capacity that covers your common jobs without constant tiling, and remember the spoilboard reduces usable Z. This simple sizing step is the best guard against buyer’s remorse and keeps cut quality consistent across projects.
Footprint and Layout
Measure doors, aisles, and turning radii for delivery and daily use. A 4×8 router typically needs clear perimeter space for staging sheets and operator movement, plus a place for a vacuum or dust collector. Plan where the controller, monitor, and emergency stop will live so nothing blocks travel or visibility. Good layout shortens load/unload time, reduces handling, and prevents trip hazards — all gains that show up in cycle‑time math.
Power and Noise Constraints
Check voltage and amperage before you commit. Desktop and benchtop units may run 110–120V; mid/large gantry routers often need 220V single‑phase or three‑phase. Noise rises with feed rates and chipload, and dust collection adds decibels. Simple steps — enclosures, placement away from offices, and rubber feet — keep work pleasant and protect neighbor spaces.
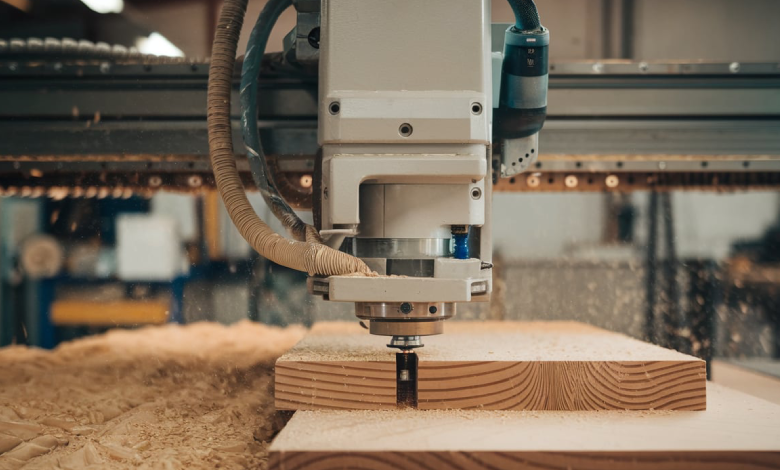
Materials a CNC Router Can Handle
Match materials to rigidity and spindle power so cuts stay clean, tools last, and finishes need less work. Choose bits that suit the stock and the kinematics of your machine. We’re talking about spindle power and rigidity working together.
Material Classes and Bit Choices
Softwoods and many plastics cut quickly with sharp upcut spirals and larger stepovers. Hardwoods and aluminum want stiffer setups, lower runout, and better chip evacuation. V‑bits carve detail; compression bits reduce tear‑out in plywood; O‑flutes help with acrylic. Keep a small starter kit and add profiles as jobs demand. Proper feeds and speeds prevent burning or melting and keep edges crisp, which shortens finish time on the bench.
Spindle Power and Finish
A sturdy frame and rails keep the tool on path when loads rise. More watts (or HP) help maintain surface speed and chipload in thick or dense stock, preventing chatter that telegraphs into the finish. If you routinely cut hardwoods or non‑ferrous metals, prioritize stiffness and power over raw table size; you’ll save time on every pass and extend tool life.
CNC Router Motors and Motion Systems
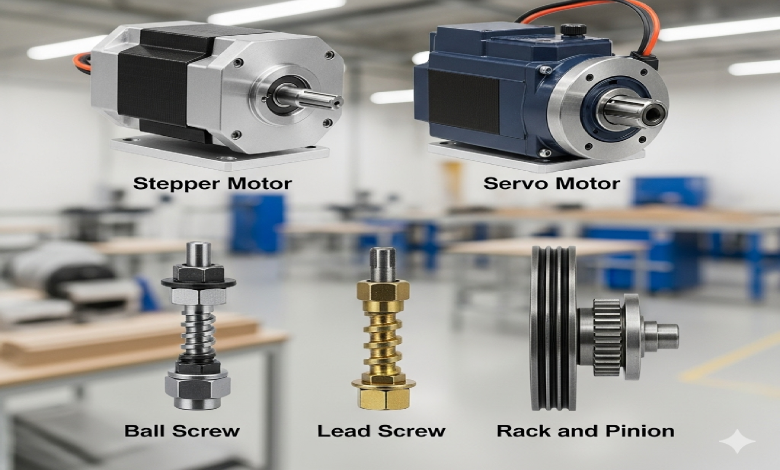
Steppers are affordable and simple; servos add feedback, speed, and smoothness. Drive systems — ball screw, lead screw, or rack and pinion — shape accuracy, maintenance, and cost.
Stepper vs. Servo Basics
Steppers move in open‑loop steps and shine at lower speeds with high holding torque, but can skip under heavy load. Servos close the loop with encoders, correcting position for better acceleration and top speed at a higher cost. For light woodwork and signage, steppers are fine; for tight tolerances, heavy parts, or production throughput, servos can pay back in finish quality and cycle time.
Ball Screw and Lead Screw
Ball screws deliver excellent precision and circularity with minimal backlash, ideal for inlay fits and fine engraving. Lead screws are simpler but can show more backlash over time. Rack‑and‑pinion systems scale well for long travel and fast gantries but may trade a bit of fine detail if not tuned. Pick the drive that aligns with your parts and tolerances, not just the spec sheet headline.
Software and the Training Curve
Your CAD/CAM and controller must run on your OS, post to your machine, and match your team’s skill level. Budget time for training so jobs go right from day one. Get your CAD/CAM software set early.
Design to Toolpath Workflow
Most routers speak G‑code generated by CAM from your 2D/3D model. Test‑drive design and CAM trials, verify available post processors, and confirm support for formats you use (e.g., DXF, SVG). Plan where you’ll store tools, feeds/speeds, and material libraries so programs are repeatable and shareable on the floor.
Training and Documentation
Expect a learning curve. Vendor classes, tutorials, and documentation reduce scrap and bring operators up to speed faster. Budget for paid sessions if they save weeks of trial‑and‑error. Clear SOPs for setup, zeroing, and tool changes prevent most first‑month mistakes. Evidence Pack: keep a job sheet with tool IDs, bit stick‑out, and screen captures of toolpaths for repeat runs.
Power and Shop Setup
Confirm voltage and amperage with an electrician, then contain dust to protect people and machines. Good dust collection also preserves accuracy by keeping rails and collets clean.
Electrical Requirements by Class
Benchtop routers may run on 110/120V, while many shop‑floor machines need 220V single‑phase or three‑phase power. If a three‑phase system isn’t available, a rotary phase converter can bridge the gap. Plan dedicated circuits for the spindle and dust collector to avoid nuisance trips that ruin parts mid‑cut.
Dust and Airflow
A shrouded boot connected to a high‑CFM collector keeps fines out of lungs and bearings. Shop vacs work for small beds but clog quickly; cartridge‑filtered collectors hold suction longer. Clean, dry air improves finish and extends tooling life. Schedule filter checks and empty drums before long jobs — it’s cheap insurance.
Costs Analysis
Price the system, not just the sticker: machine, software, tooling, shipping, install, training, power, and upkeep. Then test real cycle times to project payback. That’s true total cost of ownership.
Price Tiers and Add‑Ons
Entry machines can start in the low thousands; mid‑range and pro routers scale sharply with table size, rigidity, and options. Add software licenses, shipping/rigging, installation days, and training. Expect ongoing spend for bits, collets, spoilboards, lubricants, and filters. A clear line‑item budget avoids surprises and helps you compare offers apples‑to‑apples.
Modeling Payback and Utilization
Estimate weekly run hours, part counts, and rework reduction. Include labor moved from hand routing to unattended CNC time. ROI often comes from consistency — fewer scrapped parts, tighter fits, and faster repeat jobs. On balance, a conservative utilization model beats optimistic assumptions and keeps cash flow realistic.
Five‑Minute Quick‑Scan: dates for install/training → exclusions in quotes → monthly payment → remedy if parts back‑ordered → who to call first.
Common CNC Router Cost Buckets
| Item | Typical Range | One‑Time/Recurring | Notes |
| Machine base | $5k–$100k+ | One‑time | Frame, spindle, controller. |
| Software | $2.5k–$10k (+$1k/yr) | Both | CAD/CAM license + maintenance |
| Tooling/collets | $200–$1k start | Recurring | Bits, collets, replacements |
| Shipping/rigging | $350–$3k+ | One‑time | Freight, riggers, access. |
| Install/training | $500–$1k/day | One‑time | 1–5 days typical |
New vs. Used CNC Router Machine
Used can stretch the budget if you secure support, parts, and a real warranty. Avoid “as‑is” buys unless you can service them yourself and accept downtime risk. Check warranty and support terms closely.
When Used Makes Sense
If you’re validating a business model or running lighter-duty materials, a refurbished unit from a reputable seller can be smart. Confirm controller versions, hours, and any upgrades completed. Ask for a documented demo run and maintenance records so you know what you’re inheriting.
Warranty
Insist on at least a one‑year warranty on refurbished machines, and verify parts availability for the controller and drives. If a vendor can’t provide replacement boards or encoder parts, your savings can vanish with one failure. The right support terms often matter more than a small discount on the sticker.
Automation and Upgrades That Scale
Upgrades like an automatic tool changer and probing reduce setup time and errors. Add a 4th axis or vision when the work needs it, not just because it’s cool.
Tool Changers and Probing
Auto tool changers pay off when a job uses multiple bits or you run frequent changeovers. Probing automates Z‑zero and part alignment, shrinking scrap on nested sheets or one‑off carvings. These features raise repeatability and free operators for value-added tasks.
Rotary and Vision
A rotary axis unlocks turned profiles and reliefs; vision systems align print‑to‑cut workflows. Add them when you have revenue work queued, or when they unlock a clear new product line, such as cylindrical posts or print‑registered panels. Plan the wiring and controller slots for later growth if you’re not buying day one.
Demos and Vendor Support
Always require a demo of your material with your toolpaths. Vet training depth, parts stocking, and response times before you sign. This validates the support you’ll live with for years.
Proof with Your Material
A factory run using your DXF/SVG and bits confirms reality: cycle time, edge quality, and vacuum hold‑down. Measure parts out of the demo and compare to the tolerance. If you can’t travel, ask for a live video and the G‑code back for verification.
Training and Spare Parts
Ask who answers the phone, the average response time, and where parts ship from. Confirm training hours included and paid add‑ons later. Stock spare router bits and vacuum hold‑down gaskets to avoid minor failures sidelining the machine. Evidence Pack: keep contact names, emails, and your machine’s serial number handy.
Safety and Maintenance
Guard moving parts, use E‑stops, and enforce PPE. Build simple daily/weekly checks so accuracy stays high and downtime stays low. Good warranty and support still can’t replace basic care.
Operator Safety
Train operators on E‑stops, safe jogging, and bit changes. Shield belts, spindles, and pinch points; never bypass interlocks. Clear policies reduce risk and insurance headaches while keeping productivity steady on long jobs.
Care Routines
Clean rails and collets, inspect the boot, and vacuum the cabinet to protect electronics. Log spindle hours and change consumables before failure. A 5‑minute checklist each shift prevents most finish defects and rescues uptime across the month.
How Xmake Helps You Choose and Set Up
Xmake’s concise guides help you identify machine classes and pick software that fits your workflow. Use them to map your next steps with less guesswork.
Pick the Right CNC Class
Start with the differences among routers, mills, and lathes so your choice matches materials and tolerances. This overview of machine types makes the landscape clear; it also helps you future‑proof decisions about envelope and motion. See Xmake’s guide to different CNC machine types.
Plan Your CAM Stack
Your CAM picks shape toolpaths, feeds/speeds, and post processors. Try a few, compare licensing, and pick one your team can learn quickly. For shortlists and pros/cons, see Xmake’s post on best CAM software for CNC.
Conclusion
You don’t need every bell and whistle to succeed — you need a router that fits your parts, your space, and your skills. Size the envelope to your projects, choose rigidity and spindle power to match materials, and make software/training part of the plan. Price the full ownership picture, run a proof cut on your stock, and confirm support before making a purchase. With this checklist, you will choose a CNC Router Machine with confidence and grow into upgrades as your work demands.
Still unsure which CNC router is the best fit for you? Explore Xmake’s CNC machining services or get a quote for your project.
FAQ
What size router should I buy for cabinets and signs?
Prioritize a bed that fits your largest panels with safe perimeter space. Measure your common sheet sizes, add room for staging and dust hoses, and avoid constant tiling that slows jobs.
Are steppers “good enough” for woodworking?
Yes, for many shops, servos help with speed and accuracy under load. Steppers shine at lower speeds; servos add feedback and smooth motion for tight tolerances and faster cycles.
Do I need three‑phase power?
Not always; many machines run 220V single‑phase or use a converter. Check the spec plate and plan dedicated circuits for the spindle and dust collector.
Is a used router worth it?
If it includes a real warranty and proven parts support. Verify controller versions, demo cuts, and parts availability to avoid “as‑is” risks.