Remove Objects with AI vs. Photoshop: A Side-by-Side Comparison
How to Remove Objects with AI?
How to Use
Step 1: Open your web-browser of choice and type in www.BeautyPlus.com
Step 2: You’ll be taken to the BeautyPlus landing page with a number of tabs across the top.
Step 3: Under Online tools you’ll find “AI Object Remover” click on it.
Step 4: You’ll be taken to an editor. Now you can click the “Upload Image” button and select a photo from your device.
Step 5: Draging your mouse or your finger (if you’re working on a touchscreen) over a specific object in the photo, you can “color-in” the object you want to remove. You could even remove person from photo if you so wish.
Step 6: Now click the “Erase” button on the right and wait for the AI to process the image. This may take a few seconds.

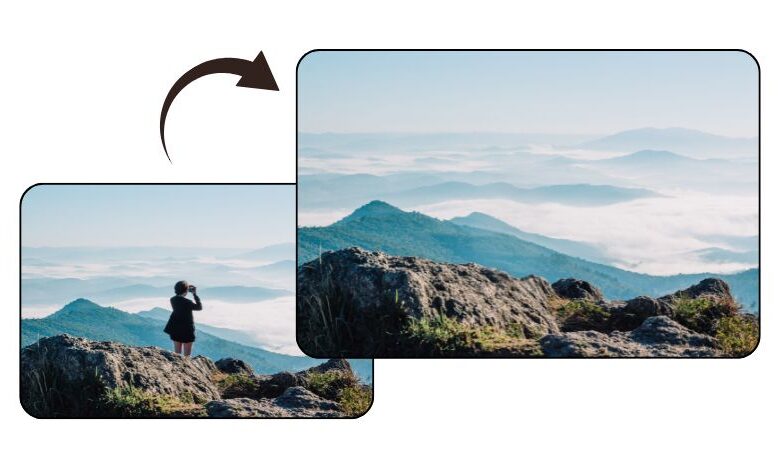
Step 7: The output image will have the object you highlighted ‘erased’ and seamlessly filled out as if it was never there.
Step 8: You can save they picture by clicking on the “Download” button and saving it to your device gallery.
Pros
- Super easy and fast.
- No design skills required.
- Ideal for mobile users and on-the-go edits.
Cons
- Limited editing precision.
- May not handle complex backgrounds perfectly.
- Some features require in-app purchase.
How to Remove Objects with PhotoShop?
A traditional editing tool loved by millions around the world for the number of editing possibilities it provides, one of which is object removal. Photoshop gives you a plethora of tools to achieve whatever you feel like with your photos.
You can zoom in and add or remove details as well that can make the photo even better. It is an editor that performs whatever you ask it to with surgical precision but that also means you need to be as precise as a surgeon when using it. That is why people hire professionals for the job, it’s not the easiest tool to master. That said, no one can deny that it is monumentally powerful compared to other tools of its time. Here is how you can remove objects from photos using Photoshop.
How to Use
Step 1: Open Photoshop on your browser and select free trial or purchase the license, it does have an online tool that you can use without having to download it
Step 2: You’ll be greeted by the standard editor that we all know and love. Open your image in the editor.
Step 3: Now, click on the remover tool from the panel.

Step 4: Very carefully, select the object you want to remove by tracing your mouse around it, you can also use a stylus if you have the option. The more precise the tool and the trace, the better.
Step 5: The object will automatically be removed.
Step 6: Save the edited photo to your device.
Pro
- High precision and control.
- Excellent for detailed or professional edits.
- Works well with any type of image.
Cons
- Requires a paid Adobe subscription.
- Can be complex for beginners.
- Slower compared to AI apps.
Comparison of the Two Ways
There are key differences in how these two tools operate. Here is a side-by-side comparison of all the ways each of these tools ‘one-ups’ the other.
| Feature | Photoshop | BeautyPlus |
| Ease of Use | Moderate to Difficult | Very Easy |
| Editing Speed | Slower | Instant |
| Precision | Very High | Moderate |
| Ideal For | Professionals, Designers | Everyday users |
| Platform | Desktop (Windows/Mac) | Desktop and Mobile (Android/iOS) |
| Internet Required | In the online tool yes, downloaded, no. | On the website, yes, on the application, no |
| Cost | Subscription required (only has a free trial) | Free + Premium (for some tools) |
Bottom line
Both tools achieve the same result but the way they go about it is what makes all the difference. While Photoshop gives you the ultimate control and precision, it requires time, skill, and money. It is a legacy, for sure, but that also means it is too complex for most people to operate. As an editor, it lives up to its reputation. AI on the other hand, tools like BeautyPlus are accessible and affordable to all. They do not require you to jump through hoops to get what you want out of a picture as the AI does all the heavy lifting for you. It is perfect for everyday use but doesn’t deliver the same professional finish as Photoshop. That said, for a quick, no-fuss fix, BeautyPlus gets the job done.